Table of Contents
Virtual Education - User Manual
5. Presentations
The advanced “Presenter” feature on the cybaLOUNGE platform seamlessly combines various formats (PDFs, slides, videos, websites, etc.) from web sources into a cohesive presentation.
In essence, the new presenter serves as a container for a set of URLs, meaning all displayed content is identified by a unique web address. This allows the utilization of (almost) any webpage or the storage of images and other content on a file-sharing platform like Dropbox or OneDrive, for example.
The administrative tools of the new presenter allow to add and manage the URLs “pointing” to the presenter’s content.
Refer to the tutorial on HOW TO: Use the presenter for detailed instructions.
5.1. Add the Presenter
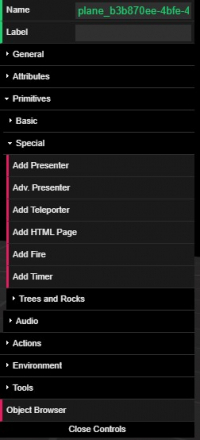
Integrate the “Presenter” into your location by opening the “Location Editor” or “Builders Menu”  and, in the “Location Editor” menu, select “Primitives” → “Special” → “Adv Presenter”. The “Presenter” object will appear in front of your avatar.

5.2. Placement of the Presenter
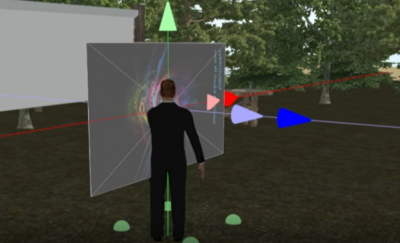
Now, position the “Presenter” according to your needs. Object placement involves three steps: rotation, position, and scale. Use trial-and-error for this process. Negative numbers are accepted; just add a ”-” (minus) in front of the number.
- Rotation: In the “Location Editor” menu, choose “Attributes” → “Rotation” → “Rotate Y” for horizontal rotation, using degrees.
- Position: In the “Location Editor” menu, choose “Attributes” → “Position” → “PosX/Y/Z” for the coordinates.
- Scale: In the “Location Editor” menu, choose “Attributes” → “Scale” → “ScaleX/Y/Z” for scaling the object.
Close the “Location Editor”  in the bottom toolbar by clicking on the symbol to finalize the placement of the “Presenter”.
5.3. Add Content to the Presenter
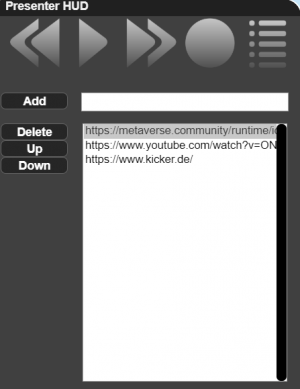
After successful placement, click once on the “Presenter” object in the cybaLOUNGE environment. The “Presenter HUD” menu will appear on the upper left side of the interface, allowing you to start adding your content.
The five icons represent five actions, which can be triggered individually:
• ARROWS LEFT: Move to the previous slide
• PLAY: Start an automatic slide show
• ARROWS RIGHT: Move to the next slide
• DOT: Close the HUD
• MENU: Open the advanced menu (for users with administrator rights only)
Management of the presentation features:
• ADD: Adds the URL in the input field to the list of addresses. Alternatively, if this dialog is open and you are dragging a URL from your browser’s address bar into this window, the address will also appear in the input field.
• DELETE: Deletes the highlighted entry from the URL list
• UP: Moves the highlighted entry one position up in the URL list
• DOWN: Moves the highlighted entry one position down in the URL list
5.4. Start the Presentation
Press “PLAY” in the “Presenter HUD” to display the first slide of your content and use “ARROWS RIGHT/LEFT” to switch between the slides.
To end the presentation, press the “DOT” button.


